ControllerMate Tutorials
This is a place for basic ControllerMate tutorials. When you first open ControllerMate, you'll notice 4 different windows:
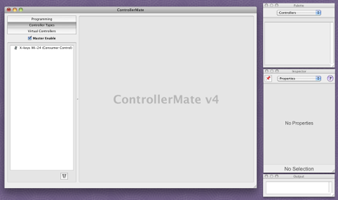
ControllerMate Window
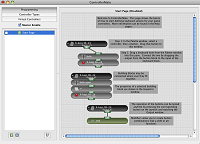
This is the largetest window available. At the top you have:
- Programming - where all your programming will happen
- Controller Types - a list of installed devices
- Virtual Controllers - often used for complex programming
A beginner with a single X-keys device probably doesn't need to worry too much about anything but Programming. Click on Programming, if it isn't already selected, and read over the tutorial on the Start Page. This is a good introduction to how programming works.
On the left side of the screen, there is a column with a check box and the Start Page listed. You may click in the check box to enable or disable the page. You probably don't need to enable it, but playing with it will get you used to the difference between what a page looks like when it is enabled (the programming is active) and disabled (the programming is still there, but inactive). Enabling and disabling pages allows you to have unlimited sets of programming.
To create a new page, click the small P icon on the lower left corner of the screen. This will give you a blank programming area. You drag and drop your building blocks (we'll get to those in a minute) in the big programming area. You can rename the pages to reflect what's on them in the Inspector window, too. More about that later.
Pallete Window
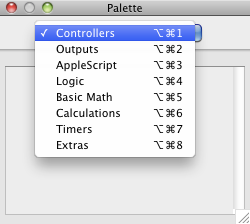
The Palette window should be the topmost window on the right side of the screen. Here, you choose all your building blocks to drag over to the programming area. There are several different categories available to you:
- Controllers (this is where your device, and the buttons you need, are)
- Outputs (most basic functions like keystrokes and text)
- AppleScript (useful for more advanced programming)
- Logic (standard logic gates such as and, not, or)
- Basic Math (addition, subtraction, multiplication, etc.)
- Calculations (for advanced numerical programming, such as counters)
- Timers (delays, pulses, etc.)
- Extras (launching Finder items, and anything else that doesn't fit elsewhere) Each of the above have their own special purpose, but we'll just touch on a couple of them that are most useful for beginners.
Controllers
When you select Controllers, you should see all the X-keys devices you have connected listed. If you only have one, then you will only see one item. If you click on it, it will expand and you will be able to access all the controls on that device (buttons, LED's). At this point, you may physically press the buttons on the device and the corresponding entry on this list will light up. This is useful if you're not sure how the buttons are numbered.
To program a button, grab it with your mouse and drag it over to the programming space you created on your New Page. Drop it wherever you want to on the page, it can be as tidy or as messy as you like.
Outputs
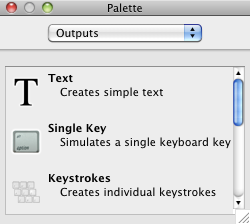
This is where most of the things you'll need live. Under Outputs, you'll find these options:
- Text (simple text such as your name, or paragraphs)
- Single Key (a single key and/or modifiers, for example "Shift" or "Cmd+W")
- Keystrokes (a series of keystrokes, commonly used for macros)
- Cursor (mouse movement)
- Mouse Button (mouse clicks)
- Scroll Wheel (mouse scrolling)
- Beep (generates a beep, can be used as an indicator of when programming reaches a certain point)
Timers
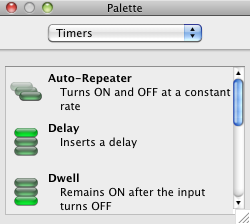
When just starting out, you won't need most of the stuff in this category, but particularly useful is the Auto-Repeater block. This can allow your programming to repeat over and over again as you hold down your X-keys button.
Also useful is the Delay block which will allow you to insert a delay in your programming, useful for if your macros aren't working quite right because your computer can't keep up.
Both of these can be dragged over to the programming area just like the other building blocks.
Extras
One of the things you might get the most use of, under Extras, is the Finder Item block. This allows you to open an application or a document with one touch of the X-keys. Like the other blocks, this can be dragged over and dropped underneath the proceding blocks.
Inspector Window
The Inspector window is where you define all the behavior of the building blocks you've added to your buttons. In order to define or edit a building block's behavior, you'll need to highlight it on your programming page. Then, the Inspector window will change to show you the options you have for that particular block.
The Inspector window can look drastically different depending on what kind of building block you have, but we'll cover a few right now to help get you familiar with the concepts.
Text
The Text building block offers you a simple text entry box. Just type the text you want the X-keys button to send here.
Single Key
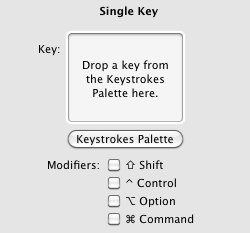
To program a Single Key, you'll need to click on the button that says Keystrokes Palette to bring up an on-screen keyboard. Then, you only need to drag the key you want X-keys to emulate from the keyboard to the Inspector window's box. There are check boxes for modifier keys, if you want to combine your single key with those, which is useful for keyboard shortcut combinations.
Keystrokes
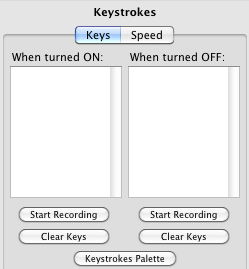
With Keystrokes you simply need to drag and drop keys from the Keystrokes Palette (much like with Single Key) but it offers you a window with two columns that you can drag and drop keys to. When turned ON: means that when you press your X-keys button, those keystrokes will send. When turned OFF: mean that when you stop pressing the X-keys button, the keystrokes will send.
Most circumstances allow for When turned ON: to be used alone.
An example of using both would be if you needed one keystroke to execute when you press the key (for example, a multimedia Play button), but another (for example, a multimedia Pause button) to execute when you let go.
Output Window

The Output window is simply a place to test your programming, if you have used text or visible keystrokes programmed to the button. Simply place your cursor in the box and hit the button and it will play back your text or visible keystrokes.
Programming Keyboard Shortcuts
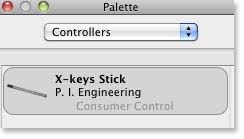
When you start up ControllerMate, there will be several windows. The first one we'll worry about is by default on the right hand side. This is our Palette window. There's a little drop-down box on top. You want to click on that and choose Controllers if it is not already chosen. If your device is connected to your computer, then you should see it listed here. I have a Stick connected so it looks like this:
Click on your device, and it should expand so you see lots of different buttons under it. You can physically push a button on your X-keys to see which one is which -- the one you press will light up.
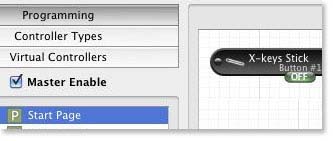
Now we need our programming area. Over in the main ControllerMate window you'll have several buttons on the upper left side. Make sure Programming is selected, then move down and see where you have the Start Page and click on that. You should have a workspace now on the right side of the window. You'll drag your X-keys buttons, and your programming choices, over to this workspace.

In order to program keystrokes you'll drag a button from your controller over (like I did in the picture above). Then you'll go back to your Palette window and click the drop down box. What we want is the Outputs choice. From here we can choose Text, Single Key, Keystrokes as well as several mouse functions. What we want is just Keystrokes so we'll click on that option and drag it over to the workspace area. It should snap together with your button, as on the left.

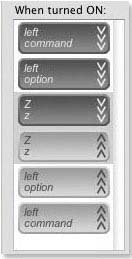
Now you can program your keystrokes! Let's say that you need to press Command+Option+Z in order to do something in a program you use. Let's select that Keystrokes block we just added and glance over to the left side of our screen to find our Inspector window. You may need to press the button that says Keystrokes Palette in order to bring up the keyboard. All you have to do is drop your keys into this area.
If you want the keys to play one after another, like typing, you would drop the Command in, then drop theOption right after it, then finally the Z. Usually what people need, however, is for the keys to play together, as in a keyboard shortcut. To do this you will need to drop each key in the middle of the last one (between down and up) like the picture on the right.
To double-check yourself, be sure that all the dark gray blocks are together, and all the light gray ones are together.
And then you're done! Your button will now play that Command+Option+Z shortcut.
Any questions can be sent to tech support. More detailed programming information can be found at Ordered Bytes.
Using Multiple Programming Pages in ControllerMate
Our Windows users are used to the Layer concept. On Mac, it doesn't work quite the same way, but you can still execute multiple "layers" of programming. This concept is called Pages in ControllerMate, and here's how you do it.
In the main ControllerMate Window, be sure that "Programming" is selected. Then, create two new pages by clicking the little green P icon near the bottom left corner of the main ControllerMate window.
Edit the first page (in the Inspector window) to be named Green Page. Page two, name Red Page. On each page you will need to drag a button from the Palette window. This works best if you use the same button on each page. For this tutorial, my examples use Button #1 on the XK-24.
Setting up the Green Page
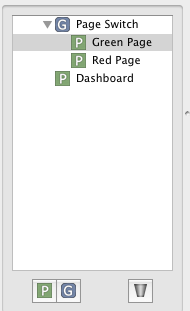
The first thing to do is to make sure the Green Page is highlighted in order to add programming to it.
Second, take that Green Page text and click and drag it to the programming area. It will become a building block that can snap into place underneath the Button #1 block.
In the Inspector window edit the properties of the page block so that When turned ON: reads Disable target.
Then, grab the Red Page text and drag that to the programming area. It snaps right into place under the Green Page block. In theInspector window, the properties should be edited so that When turned ON: reads Enable target.
And finally, the finishing touch: turning on the red LED. Go back to the Palette window (select Controllers and select your device if necessary). Scroll down the button list to the LED section and find the Red LED. This can be dragged over just like any other building block. It belongs right under the Red Page block.
Setting up the Red Page
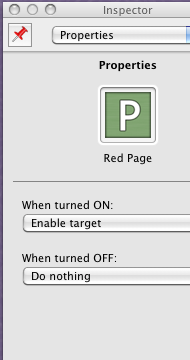
Now, highlight the Red Page in order to add programming to it. Programming this page is going to be a lot like the first one, so we will speed up the explanation a bit.
Drag the Green Page text over and connect it to Button #1. Make sure the properties are set to Enable target.
Drag the Red Page text over and connect it to the previous block. Set the properties to Disable target.
Drag the Green LED over and drop it underneath the previous block.

